building a dorade vent box
0 Nov 13: Sometimes You Just Have to ExperimentFor the last two days I have been working on an idea for the bilge pump exhaust that I first considered four or five months ago. Why don't I just drill a hole in the transom? I could, but, there are several reasons for not doing it. First, I really hate cutting holes in the boat if I don't have to. Second, I think the boat has a great looking transom and cutting holes and attaching hardware to it detracts from its graceful lines. It was one of the advantages of the Cape Horn Windvane over the Monitor . . . it just looks a little more elegant. Third, routing the bilge hose to the bilge exhaust flange if installed in the transom interfered with the below deck control lines for the Cape Horn Windvane and with accessibility to the storage system I built and installed in the lazerette locker. Fourth, by installing a dorade ventilation box over the previous engine exhaust cowl vent hole, it becomes a more all weather system and better able to keep the air flowing into the locker while reducing the likelihood of water gaining access to the lazerette in foul weather. The vent to the lazerette allows air to flow through to the quarter berth. Last, this design does not require me to cut any holes in the boat (other than four bolts down through the deck to secure the box to the deck) as the bilge hose is routed up through the preexisting hole in the deck that accommodates the former engine cowl vent. Therefore, I took some time to experiment and build a dorade box from some teak cut-offs.

Still an experiment. The bilge hose runs up through a hole in the deck that was the original hole for the 3 1/2" cowl vent, that was secured directly to the deck, and provided ventilation to the engine comparment. The dorade makes the vent all weather and eliminates the need to cut a hole in the transom for the bilge hose exhaust.
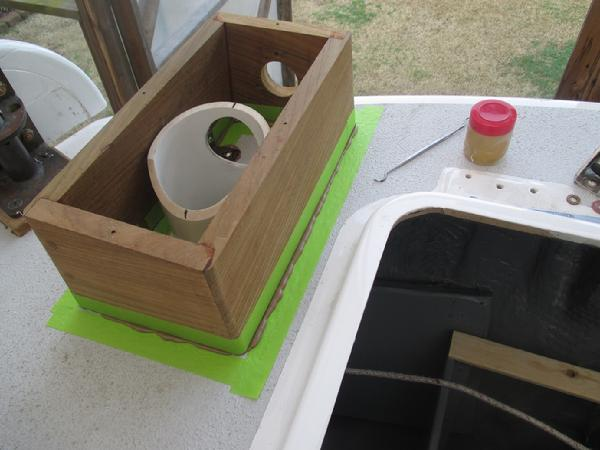
I basically followed the design and techniques described by Larry Pardey in Lin and Larry's book "Cost Conscious Cruiser." It was not difficult. It took maybe four hours to make, not including time for the resorcinol glue to dry overnight. I still need to cut a hole for the cowl vent in the lid. I am not sure how I feel about the way it looks. I am not used to seeing it there. At first, it looked a little ungainly on the fantail. But, it has gown on me a little. And, if I don't like it, all I have lost is a day of work and some teak scraps--the hole was already there. Unlike my other dorades, I will leave this one bare. As recommended by L. Pardey, I used rabbet joints to reduce exposed end grain so as to prevent checking of the grain. There is a lot of action on the fantail and it would be very difficult to maintain varnish on the dorade. Following Larry Pardey's recommendation I built the lid to be easily removable improving access to the hose barb and the bilge exhaust hose. I scribed the bottom edge of the box to to the camber of the deck so that the top is level. Though I still have much to learn about woodworking my skills improve a little every day.
Below:
1. The rabat joints reduce expose endgrain and provide more surface for gluing.
2. I used a standard Spartan Marine 1 1/2" engine exhaust flange for the bilge hose. The teak spacer extend the fitting out to the edge of the tansom. The trim piece along the edge grain protect the vulnerable end grain. I copied the techniqie from the "Cost Conscious Cruiser."
3. I scribed the box to fit the camber of the deck. The lid will be secure with bronze oval head making removal of the lid a simple task.


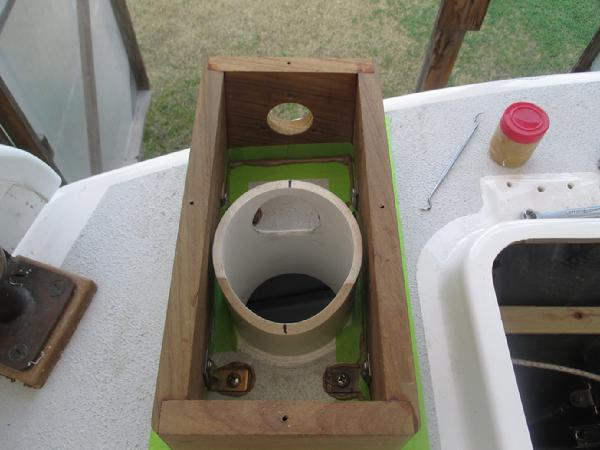
After completing the construction of the dorade box, the next step was to make the brackets to secure to the deck. Continuing to use L. Pardey's instructions in the "Cost Conscious Cruiser" I used some scrap 3/32" thick (just under 1/8" thick) bronze sheet stock for material. Using a jig saw I cut them about 5/8" wide and 2" long. I drilled a single hole for a 1/4" bolt on one end and two smaller holes for #10 pan head self tapping screws on the other end. Then I took each piece of pre-drilled bronze and clamped it in my machine vice, heated with a propane torch till it was red then tapped it over with a hammer to the appropriate angle. Then, while it was sill very hot I tapped it with the hammer to help it realign molecularly, then quenched it in water. I was very satisfied with the fit. Next, I drilled and screwed them to the inside of the box, Next, I positioned the box on the deck and drilled quarter inch holes through the deck. The deck under the aft holes was solid glass but the forward holes were over a cored deck. So, I over drilled the forward holes, dug out the core, and filled them with epoxy and left it to cure overnight.
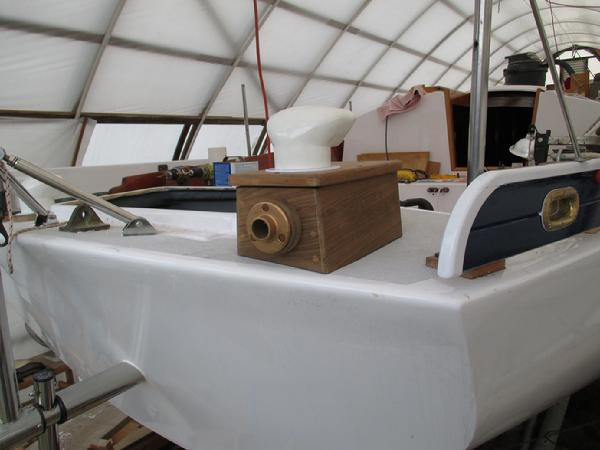
The combination dorade box and bilge/grey water exhaust is mounted. I am pleased with construction but remain unsure about the visual effect. I'll see if it grows on me.
Later in the evening, I cut thee hole in the lid for the cowl vent. I'd like for all the cowl vent deck plates for all the dorade vents to be bronze or durable brass but they are just too expensive. I'll keep my eyes open and I might come across some in a consignment shop one day. But for now, the plastic bases will have to do. Anyway, I traced the base interior ring, drilled a small hole, and cut out the ring with a Bosh jig saw. I chamfered the open and sanded it smooth. Next, I positioned the box on the deck and aligned the brackets with the recently filled epoxy plugs and drilled down through the center. Using this technique eliminates the possibility of water intrusion into the core should the bedding compound fail to keep the water out--"an once of prevention is worth a pound of cure." The next step was to shape a piece of 4/12" OD PVC pipe to perform duty as the down spout through the hole in the deck. In a perfect world the hole would be further forward--towards the bow--but that is where the original hole was and if it were further forward the bilge hose that runs up through the dorade would interfere with the starboard side control line for the Cape Horn wind vane that runs under the deck through the lazerette locker. This hole was original 3 1/2" diameter and in fact the aft cowl vents are smaller than the ones on the main cabin. I cut the hole out to 4 1/2", same as the ones for the main cabin, hoping that the larger cutout would compensate for the obstruction to the flow of air running the 1 1/2" diameter bilge hose up through the vent. I made a cut out through the PVC pipe for the bilge hose to pass in order to maintain the basic design of the dorade to keep water out of the down spout. The cowl vent air hole and the downspout do not overlap so there should be little likelihood of water gaining access below except under the most extreme conditions. After temporarily mounting the parts I ran a short section of bilge hose up through the vent and on to the hose barb. Everything looks to be aligned and with that completed I spent a little time figuring out exactly how to run the hose from the bilge pump to the spot in the lazerette where the hose rises vertically to the down spot in the dorade box. That concluded my work for the day. (photo gallery below)
Below:
1. The box is simple but I think kind of elegant. I am pleased with the way it turned out.
2. Using the original hole in the deck I could not slide the box further aft. I did not want to move it forward either as I want the bilge exhaust to clear the deck. You can see the bronze "L" brackets fabricated from sheet stock. Once positioned, I drilled 1/4" holes.
3. The forward holes (the ones on the right) were through cored deck. I overdrilled these holes and filled them with epoxy. After the epoxy cured I drilled back through them.
4. I installed the down spot and dilled a hole through it for the bilge hose. I used a piece of ruber for a chafing guard to protect the bilge hose.
5. I used four oval head screws to secure the lid to the box.
6. The port side vent. This is what the starboard side vent orginally looked like.
7. I made a trim ring from some teak cut-off. It will provide a better raised barrier to keep water out and looks better than when the vent flange was screwed directly to the deck. I can't install a dorade here as this space is reserved for the stern anchor.


I bedded the aft dorade box with teak colored Boat Life polysulfied bedding compound. It required a lot of taping to keep from making a mess. I wrapped a small donut of butyl rubber around each bolt between the bottom of the dorade and the chamfered hole in the the deck. The dorade is through bolted with 1/4" pan head bolts and aircraft locking nuts. After I tightened the bolts down, I cleaned up the squeeze out with a trowel and some mineral spirits. This project is an experiment. I hope that it works and I can avoid drilling a nearly 2" diameter hole in the transom of the Far Reach. Plus, if it works out, this kind of set up has no chance of back siphoning and thus requires no siphon break U pipe. I also bedded the forward dorade boxes with white 3M 4000.