A Rub Strip for Sweat Pea.In the midst of working on other projects, namely the solar system, I added a brass rub strip to the bottom of the keel of our 9' Fatty Knees dinghy, Sweet Pea. I had been wanting to add the rub strip for a long time. We have had Sweat Pea for 11 years. The fiberglass keel takes a lot of punishment and it was time to add the strip. For then aft strip I used a 3/4" half oval that was originally across the stern of the Far Reach. I purchased an additional 6 foot long 5/8" brass half oval for the forward strip. I counter sunk the rub strip for #8 1/2" long bronze screws. I had to keep them short to keep from punching through the strip into the boat from underneath. The strews would not be long enough to permanently secure the rub rail. But they would be just enough to secure the strip while the 3M 5200 cured, which is what I relied on to hold the rail in place. I don't normally use 5200 but this was a good project for it. If I ever need to remove the rub strip it will be easy to do with heat and a hack saw blade under the strip. Before I installed the strip I sanded it with 40 on a power sander, wiped it down with acetone and installed it. I left it in my garage for about 10 days to cure.
I used bronze wood screws and 3m 5200 to secure the rub strip in place.
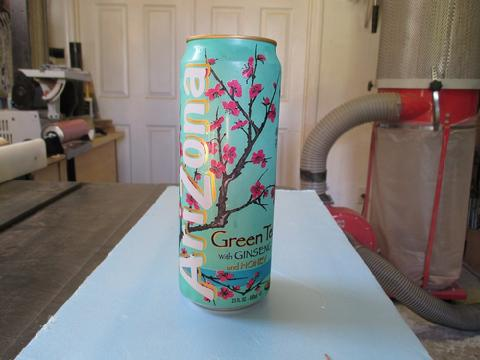
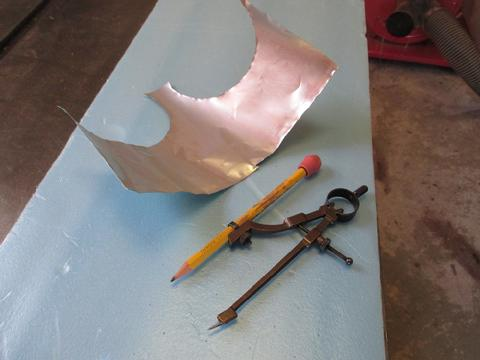
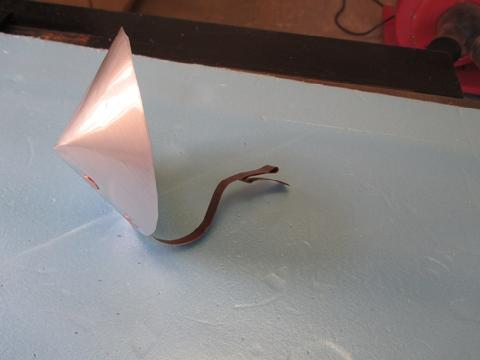
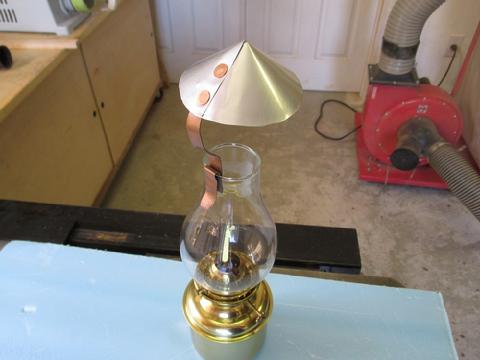
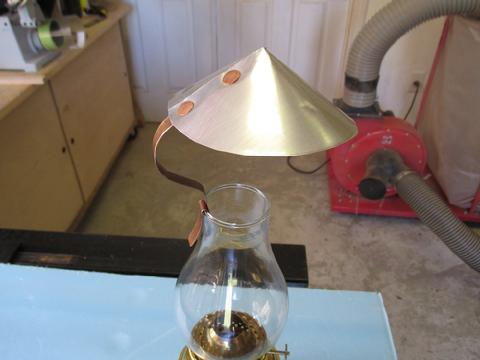
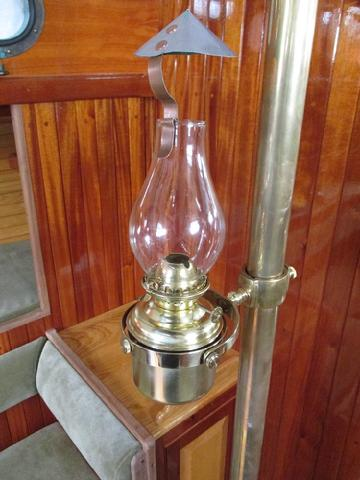
Smoke Bells. I wanted to use clip on smoke bells on our cabin lamps. They stay over the lamp even when they are swinging. And the bells don't have to be mounted on the bulkhead like standard bells which look bulky and take up space. Standard bells also limit your mounting options. I found some clip on brass bells "on line"--very expensive. Instead of throwing a bunch of money at the solution, I asked Lin Pardey how they made the ones on Taleisin. Lin was kind enough to send me a few photos of and pass along some tips. I made the bells from aluminum drink cans (Arizona Tea actually) (photo gallery below with pop up text when you click on the pictures). I used copper roofing nails as rivets. I had some scrap copper flashing in the shop. I think it is a very clever solution that looks neat and streamlined. If they go bad, I can easily make news ones for next to nothing.
Pardey style smoke bells made from aluminum cans and copper roofing nails.

They have a kind of neat modern look.
Below:
1. I used an aluminum drink can.
2. I cut the can open and laid it out flat like a sheet of paper. I used a compass to scripe a circle. I cut the cirlce out with tin snips.
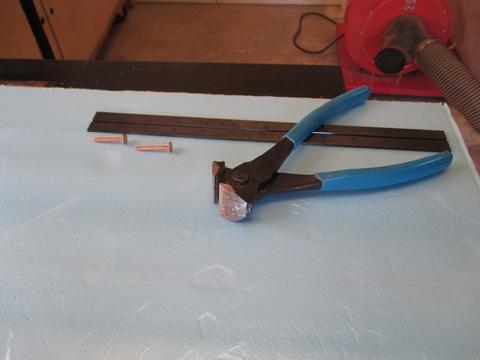
3. I used copper roofing nails and nippers to make the rivets.
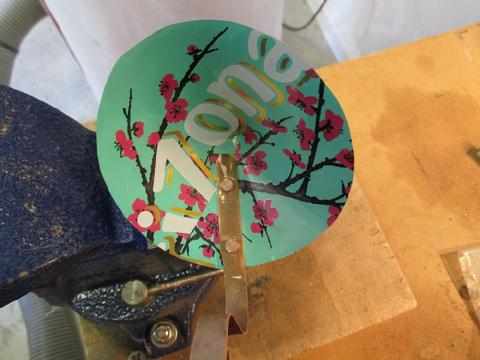
4. I cut a pie shaped wedge out of the aluminum and then pulled the ends together to make the bell. I maked the location for the rivets and made the holes. I inserted the nails and then nipped off the shanks allowing 1/8" to remain proud. I then hammered them flat using the vise as a bucking iron.
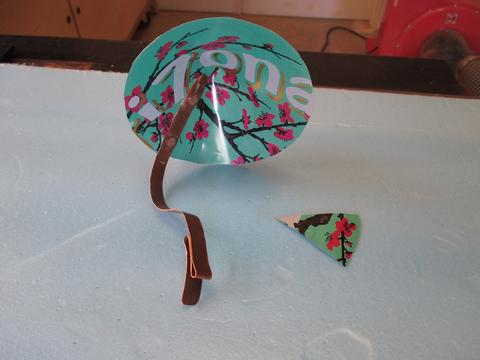
5. I gently bent the strap to poistion the bell over the top of the globe. This one has a thinner strap which I think looks better than the wide one. It's also easier to clip on the globe. The pie shaped wedge I removed from the aluminum before I marked the holes and installed the rivets.
6. The aluminum won't rust and does not need to be polished. Lin says they have never had an issue with a galvanic reaction between the aluminum and copper.
7. This is the small smoke bell.
8. This is the larger one. I made a couple of sizes to see what I liked best.
9. A clip on smoke bell gives you a lot of mounting options.
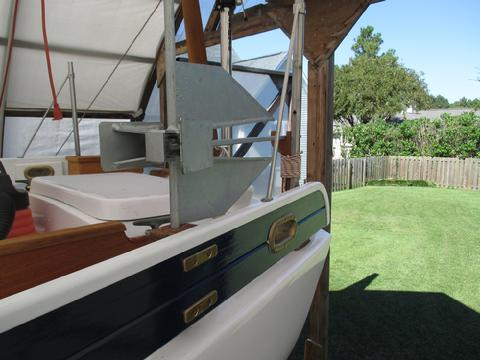
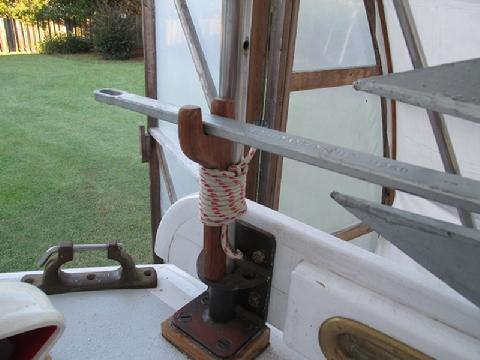
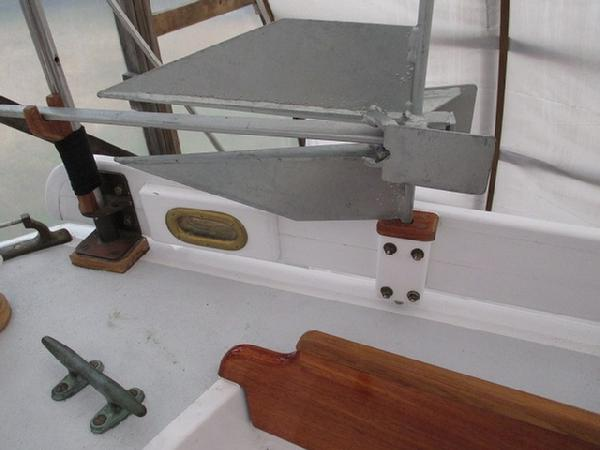
Stern Anchor. I spent a lot of time thinking about where to store the stern anchor (Danforth HT 12). I wanted to have it mounted and ready for immediate deployment but also not too visible. After trying every conceivable option (all of which took up too much space, looked awful, or were not accessible) the best solution I could come up with was mount it on the bulwark, on it's side, vertically (photo gallery below). I drilled a 5/8" diameter hole through a piece of scrap two inch thick teak. I used a jig saw to cut two small backing plates from some 3/16" thick silicon bronze. I radiused the edges with a file. I drilled holes through the bronze plates and then countersunk the holes for 1/4" bronze flat head bolts. Then, I clamped everything in place and made sure the stock of the anchor was vertical to match the stanchion--the bulwark is angled up slightly as it follows the spring of the sheerline. Next, I drilled the holes though the bulwark and the teak block.
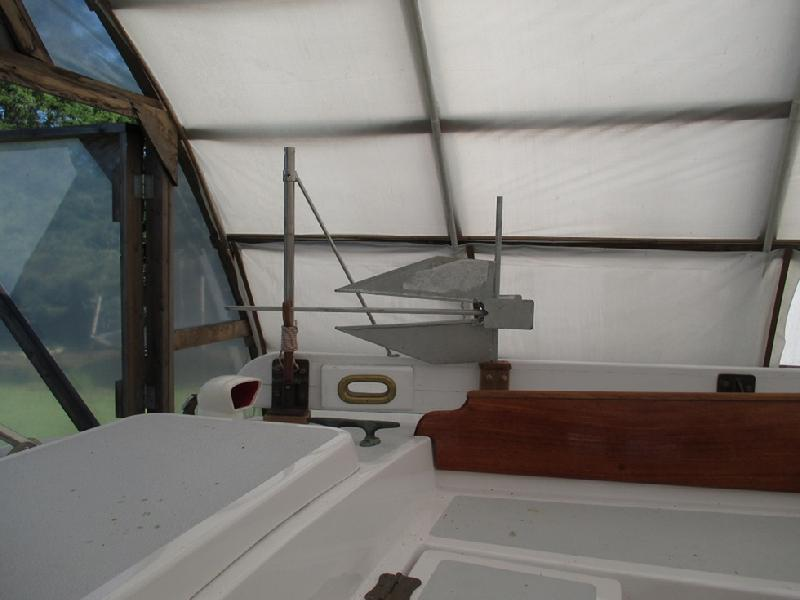
The anchor is very accessible but more obvious than I would have liked. I may make a canvas cover to conceal the anchor.
I capped the teak with a piece of ipe (in the ironwood family) which is extremely hard and very rot resistant. The ipe cap covers the vulnerable end grain of the teak protecting it from water and sun and the sharp edge of the anchor fluke. Next, I used a piece of ipe to make a hanger to support the shank of the anchor. I cut an inside concave radius on the ipe to match the curve of the stanchion. I made it long enough to rest on the stanchion base and also to hold the shank of the anchor horizontal. I temporarily lashed it to the aft stanchion with a piece of 1/4" line. Later, I will use proper lashing. The anchor is very secure, but I can deploy it immediately if necessary. I intend to leave the stern anchor line attached to the anchor. It's in a more obvious location that I would have liked but everything is a compromise and speed and easy of deployment took priority. A custom canvas cover might made it much less obvious to the eye and not slow the speed of employment enough to matter.
Below:
1. I cut backing plates from 3/16" silicon bronze.
2. Four bolts is over kill but I wanted the mount to be secure enough that, with bedding compound, water will not be able to get between the two surfaces.
3. The ipe cap is in the hardwood family. It's purpose is to protect the endgrain of the teak from sun and water and the sharp edge of the anchor fluke. I'll cut the bolts to length after I procure some bronze washers.
4. I am hoping the anchor will not be to obvious when the boat is rigged and in the water. I could cover the anchor with custom canvas cover.
5. I'll either drill, tap, and install fasteners to hold the ipe in place or secure it with proper lashing line.
6. At the bottom of the picture is the stern anchor chain pipe. The anchor line will run direct from there to the anchor and be readt for deployment when needed.

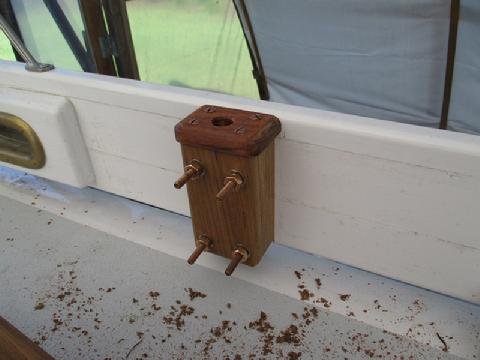
I removed the teak block I previously installed as part of the stern anchoring system and painted it with four coats of Interlux Brightside then reinstalled it with bronze nylon locking nuts which I reused from the boats original hardware. Painting the blocks helps it to better blend in with the bulwark.
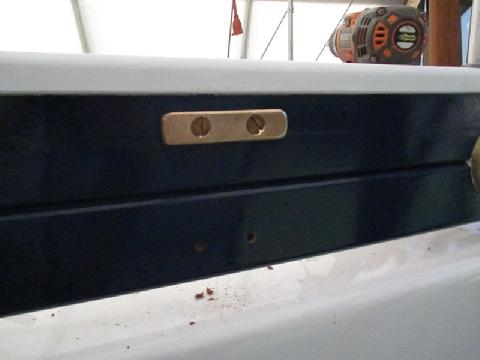
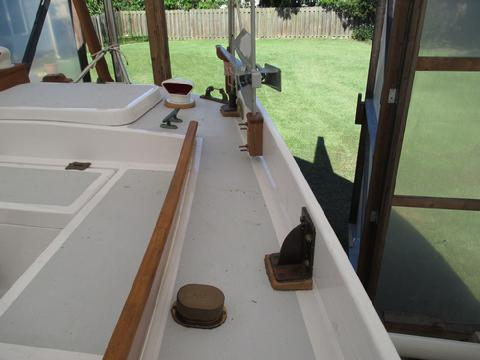
Stern Anchor and Deck Chocks. Though we have six pair of custom made hawse pipes in the bulwarks, I also wanted some chocks for running lines out directly over the transom, especially for the stern anchor. Also, I had a pair or Spartan Marine Chocks that came with the boat. They are the best I have seen so I wanted to use them. They have a capture pin on the top with a detent so they lock down in place and prevent the line from jumping out. I installed one on each side and bedded them with butyl rubber. This is a good picture of the kind of squeeze out you can expect with butyl. I installed them yesterday and usually tighten the fitting down a little over three days. This is the squeeze out for one day. I tighten them, firm but not too hard, then repeat each day till I am satisfied. Then, I trim the butyl.
The butyl will squeeze out for a couple of days. Don't over tighten them. Just firm them up each day and let the buytl do the work. Then, trim the excess.
Stern Kerosene Running Light. I used ipe for a vertical support secured to the aft stanchion. Ipe is in the iron wood family. Very hard and rot resistant . . . some say more rot resistant than teak, though it is much heavier. I cut a concave inside radius along the length of the ipe on my table saw to match the ouside radius on the stanchion. I thought about drilling through the ipe and tapping into the stanchion and then using machine screws to attach the ipe. But, I am not certain the lanterns will work out and lashing seemed like a better temporary solution. Besides, I thought it would be a good time to learn about lashing. I used the Rigger's Apprentice as a guide and #42 tarred nylon twine. Lashing is a skill and there is a lot more to you than I know. I could not use "frapping" turns due to the way I made the bracket so finishing it off was a little more difficult. I think it is a reasonable fist attempt though. I was impressed by how strong and tight the ipe is secured to the stanchion. I couldn't budge it. I also spliced the snap hook to 1/4" Dacron three strand security line. Simple after a liverpool splice in 7x7 wire.

The stern light is held on to the ipe support via a female sleeve on the back of the latern that slides over a bronze male bracket.
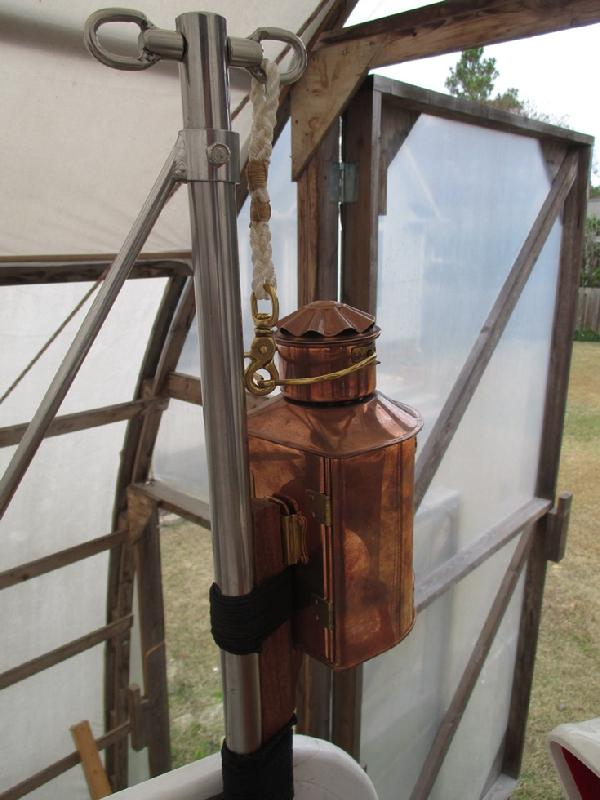
The ipe wood support is lashed to the stern stanchion via #42 tarred nylon twine.
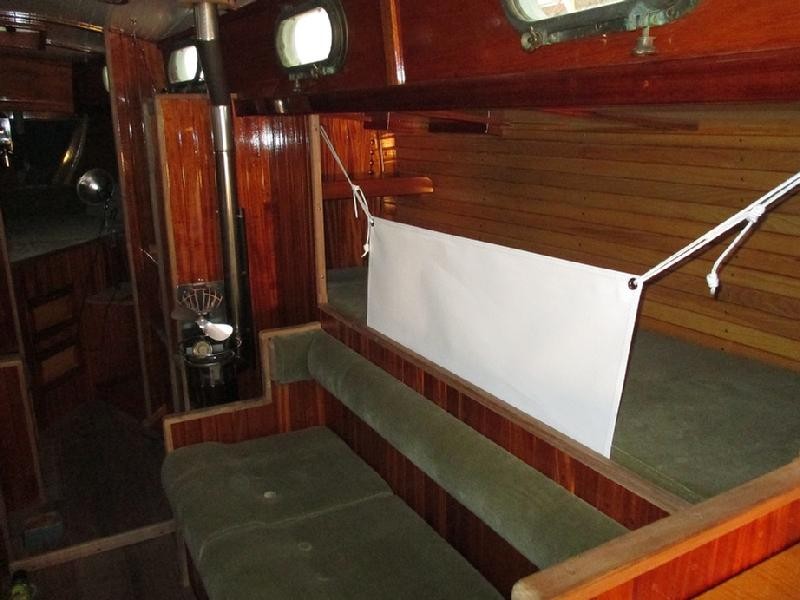
Lee Cloth Cleats. For a while I have wondered how I was going to secure the upper corners of the lee cloths that are an important component of the three permanent sea berths. I looked at lots of hooks but never found the thing I envisioned. After thinking about it, I decided to make them. I have some ipe which is in the ironwood family. Ipe is very hard and heavy. I made a pattern from some 1/4" plywood, then traced it onto the ipe. I cut the inside corners with a 3/8" paddle bit so they would be rounded. Then, I cut them out with a Bosch jig saw. I used files and sand paper to radius the outside edges and smooth the wood. I drilled holes and chamfered them and test fit them with various bronze fasteners. They looked pretty good but there were file marks that were very hard to remove because the wood is so hard. I decided to try polishing the wood using my buffing wheels (sisal and soft wheels) and polishing compound that attach to a big right angle grinder I use to polish bronze parts. What a difference it made. It took the files marks out and polished the wood to a high sheen. I am not sure if I want to make the lee cloths or have them made. Something to think about.

Cleats for the lee cloths made from Ipe polished to a high sheen.
I'm still fussing around with the hooks for the lee cloths. I think the wood ones I made from ipe are plenty strong. But, I am not confident that two #10 wood screws are strong enough to do the job if an adult is sleeping in the berth and the boat where to take a sudden knock down. I was unable to find any on-line that meet the requirement. So, I decided to make a pattern for hooks that would be cast in bronze and secured by four fasteners. I used the experience I gained making the pattern for the gammon iron. I had to design in "draft" so the foundryman and pull them from the casting sand more easily. After filleting the inside corners and sanding them, I coated them in orange glazing compound and sanded them smooth to remove minor flaws and pin holes. Then, I painted them with grey primer and sanded them again. This is how they will be shipped to the foundry. The design is ok. Simple and strong. I would have liked something a little more elegant, but my artistic side seemed to be on vacation.

After making the pattern I coated them with glazing compound then sanded them to remove pin holes and minor flaws.

Next, sprayed grey primer on the patterns. This is how I will ship them to the foundry.
The bronze hooks, from which I previously made the pattern and shipped off to Mystic River Foundry, arrived in the mail. They are very stout and will be more than strong enough for the task of anchoring the upper end of the line to the lee cloth grommets. But, the foundry does not polish the hardware so I pulled out my buffing wheels and polishing compound. In about an hour I had them mostly polished. I have a little more work remaining to finish them up which I'll get to in the next few days.
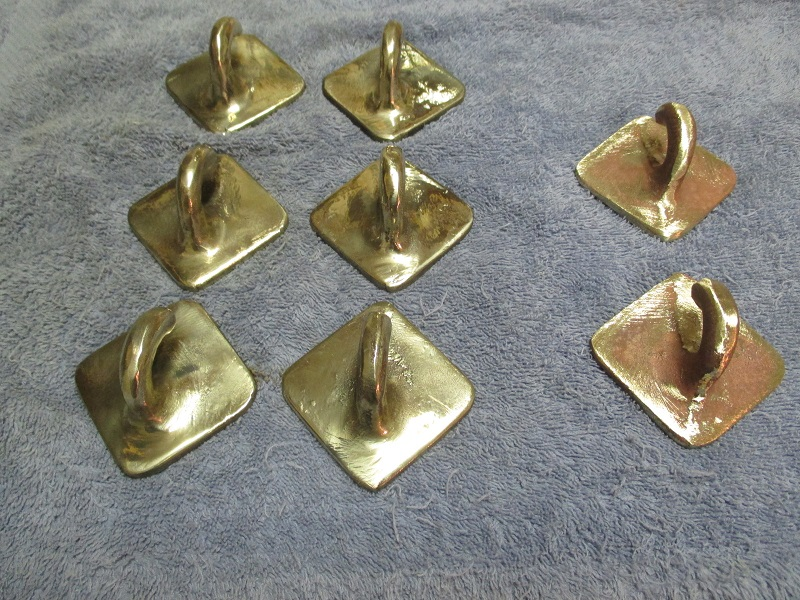
This is a poor photo. The hooks on the left have had the first round with the sisal buffing wheen with black cutting compound. The two on the right have not been polished.
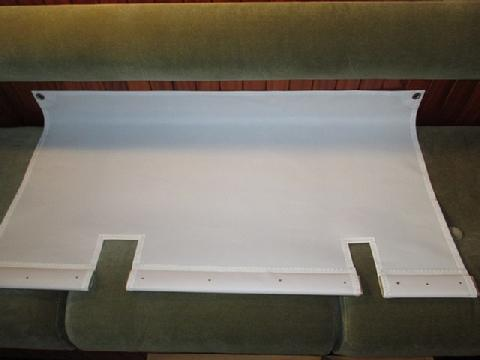
Templates for the lee cloths. Because of the foot well for the pilot berths they don't have to be very long. Due to the individual bunk boards under the cushions, vice a long sheet of plywood secured to the framing, the lee cloths have to be secured to the back of the settee below the bunkboards. It's makes the pattern a little more complicated. To keep them thin, but strong I am considering having them made from 8oz sail cloth vice sunbrella. I dropped them off with a sail maker to get an estimate. They said they would let me know in a couple of days. If it's too expensive, I'll make them myself from the cadet grey sunbrella I have on hand.

One of the three templates for the lee cloths.
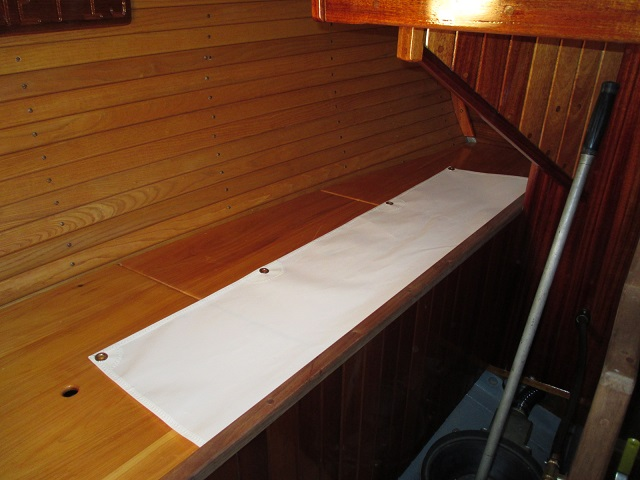
Lastly, just before my knee surgery I picked up and installed the lee cloths for the two pilot berths and the quarter berth. I had them made from 7oz sail cloth vise the usual sunbrella as they are thinner and dry quicker than sunbrella. I designed these to fit around the 'thwartship beams that support the bunk boards. They have pockets sewn into the bottom him to accommodate 3/8" thick x 1 3/8" wide ash battens that I repurposed from ceiling strips left over from rebuilding of the interior. I secured them with ss pan head #12 x 1" fasteners with ss washers. They are very securely fastened. The top edges will be secured by 3/16" dacron three strand with adjustable prussic eyes looped over bronze hooks. The hooks have not been installed as they are currently being cast by Mystic River Foundry. The lee cloths were made by Laura Turgeon and Gil Fontes at Hodges Street Sails in Oriental, NC from patterns I provided. They were delightful to work, knowledgeable, made helpful suggestions, and very professional. I am very pleased with their work.
The quarter berth lee cloth installed.
I drilled holes through the sail cloth and the battens. I then "sealed" the holes in the sailcoth with an awl I heated with my propane torch.

I designe the lee cloths to fit around the supports for the bunk boards.

The lee cloths are made from 7oz dacron sail cloth and lay flatter and dry faster than sunbrella.
After polishing the bronze hooks for the lee cloths I drilled the bases for the fasteners. I installed each of the hooks for the pilot berth with four #10 1 1/2" bronze wood screws. The quarter berth hooks are through bolted as the wood is not thick enough for the long screws. I decided to used 3/16" dacron double braid to secure the lee cloths to the hooks. I made a continious loop in the line with a stopper knot in one end and a pruisk in the other. I think this arrangement will allow us to adjust the lee cloths while in the berth and make it easier to loosen the line and then slip it off over the top of the bronze hooks. Once I am satisfied with the arrangement I'll sew the tail on the prusik end down and may also sew the loop around the grommet so the entire line can't slide. Done that way, I think you could adjust the line with one hand.
All three lee cloths are installed--the two pilot berths and the quarter berth.
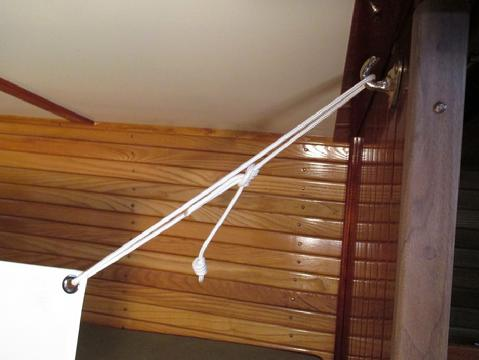
I used a standard prusik to allow for adjustability while lying in the bunk. I will sew the tail of the prusik down later once I am sure it works the way I want. I may also lash the line around the grommet to hold it in place. Experience will guide us.
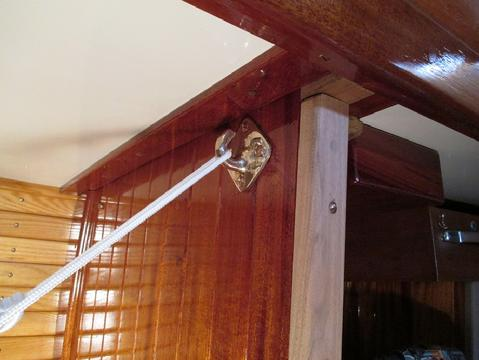
Mystic River Foundry cast my lee cloths hook from pattern I made. They are silicon bronze. They polished up nice. I secured them with (4) #10 1 1/2" long bronze wood screws.

The quarter berth had unique challenges. There is not a lot of room. Also, I through bolted the hooks through the trim and then though the lower ede og the cabin side that extend a little below the side deck.
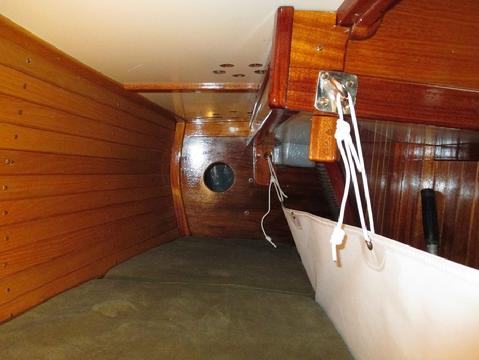
The quarter berth. I epoxied a 1 1/8" thick 2"x2" ash block to the underside of the cockpit locker and then screwed the hook into the block. I painted the block and the underside of the locker grey. In the foreground you can see the through bolted bronze hook for the middle of the lee cloth.
Sea Anchor
I installed a heavy duty 3/4" galvanized thimble to the 8' military surplus Bureau of Ordanance parachute sea anchor we purchased a few months ago from Fioeintino Para-Anchors. I used #42 tarred nylon twine to "serve" the apex of the suspension lines. After bending the served portion around the thimble, used clamps to hold it in place. The thing was too big for my splicing vise. Then, I used the same nylon twine as whipping to secure the suspension lines together and secure the thimble in place. Later this winter we will make a canvas bag for the parachute and supporting swivel and shackles.
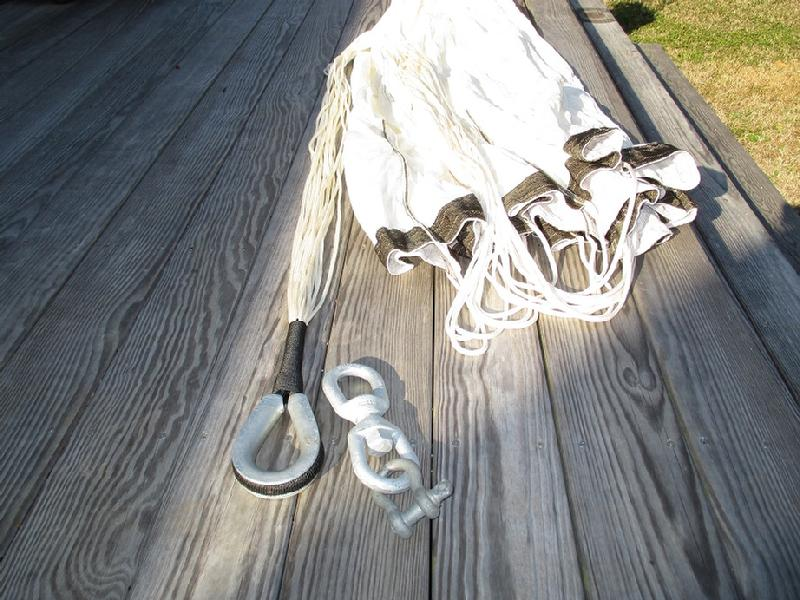
The sea-anchor, US made HD thimble, and 5/8" US made forged swivel cost less than $200 complete.
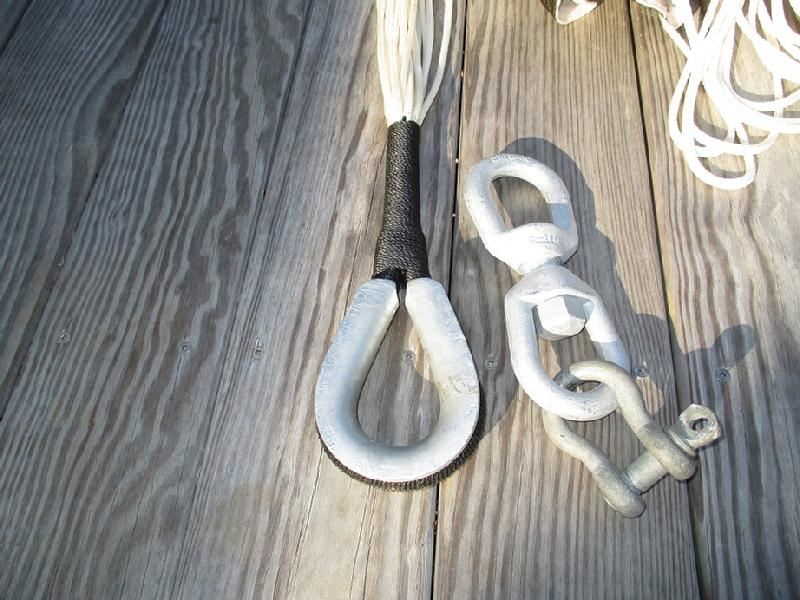
I "served" the suspension lines with #42 tarred nylon twine and then lashed it with the same line to secure to a HD 3/4" thimble.
Spray Hood
We would like to avoid the ubiquitous full width dodger on the Far Reach. Well built dodgers are shockingly expensive. They restrict your view forward, they can be hot on a warm day by blocking the breeze across the cockpit, They are difficult to remove, they interfere with storing a dinghy on the cabin top, and they add a lot of cross section windage when anchored. Plus, unless they are really designed and built properly I think they detract from the lines of the boat. On the other hand, they provide shelter for the crew in the rain and when beating in heavy conditions. They also allow the companionway hatch to be slid open improving below deck ventilation when there is spray coming over the deck or its raining. We have decided to work the middle ground by installing a flexible and easy to remove spray hood, based on a Pardey design, that will fit only over the companionway hatch itself. I'll write more about the design later but in the mean time I needed to make and install some bronze inserts in the teak companionway hatch supports for the spray hood to attach to. I cut the diamond shapes with a Boshe jig saw (a metal band saw is the best way to accurately cut them) from a plywood template I made and smoothed them with my bench top grinder and metal files. I practiced cutting recesses in some scrap wood as my skills with a chisel are pretty basic. They are secured with #8 wood screws. I tapped the center hole for a 10-24 bronze marine screw. I installed seven of them with two more to be installed later once the hood frame is built (we will build it ourselves). I will remove and bed them in the next couple of days.
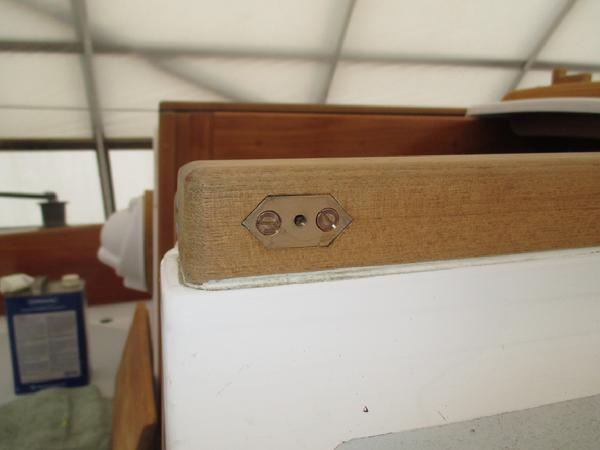
This is one of seven bronze inserts I installed as part of the support build for the spray hood.
Casting Lead Ingot for Trim Ballast
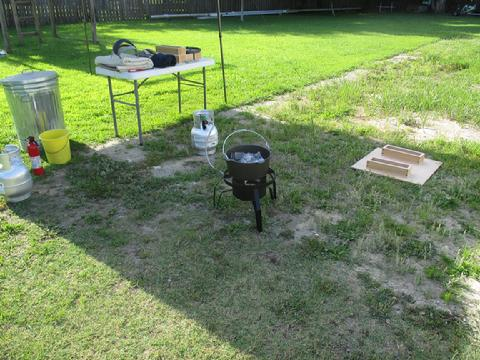
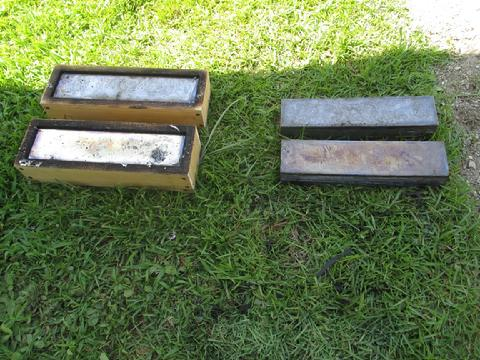
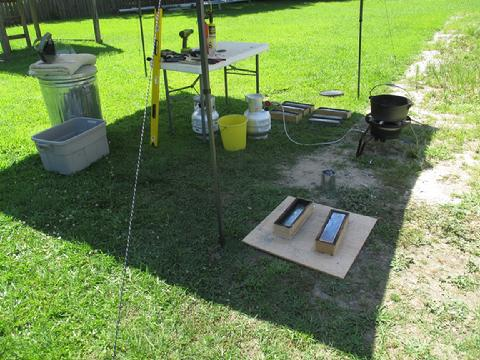
16 Jun 15 -- Casting Lead Ingots for Trim Ballast.As we prepare the boat for our first sail we need to add some ballast trim. This is necessary because we do not have the 400 lbs of Perkins 4-105 50 HP diesel engine and its component parts in the aft end of the boat. Nor do we have the weight of the pedestal steering system or the heavy starting and house battery bank. At the moment, without stores the Far Reach is sitting pretty close on her lines because we do have a 20 gallon water tank and a 10 gallon kerosene tank in the cockpit lockers. We also have about 110 lbs of anchors and another 40 lbs in bronze bilge pump under the companionway cabin sole. Those things helped trim the boat level fore and aft. But, we are about to add 275' of 5/16 G4 chain for almost 300 lbs in the chain locker. The Far Reach will definelty feel that weight in the bow even though we moved the chain locker two feet aft of it's original location. I do think we will be able to largely counter that weight with tools and other stores during extended cruising. But, I would like for the boat to be sitting on her lines even when we are in a lighter displacement local sailing mode. To that end, last week I picked up about 236 lbs of scrap lead from a local recycling center. It was sheet lead that came out of a hospital. I cut it into small sections. Today, I melted it down and cast it into seven 30 lbs bars and one 15 lbs bar for a total of 225 lbs of almost pure lead. It was not a difficult job though I had never done anything like it before.
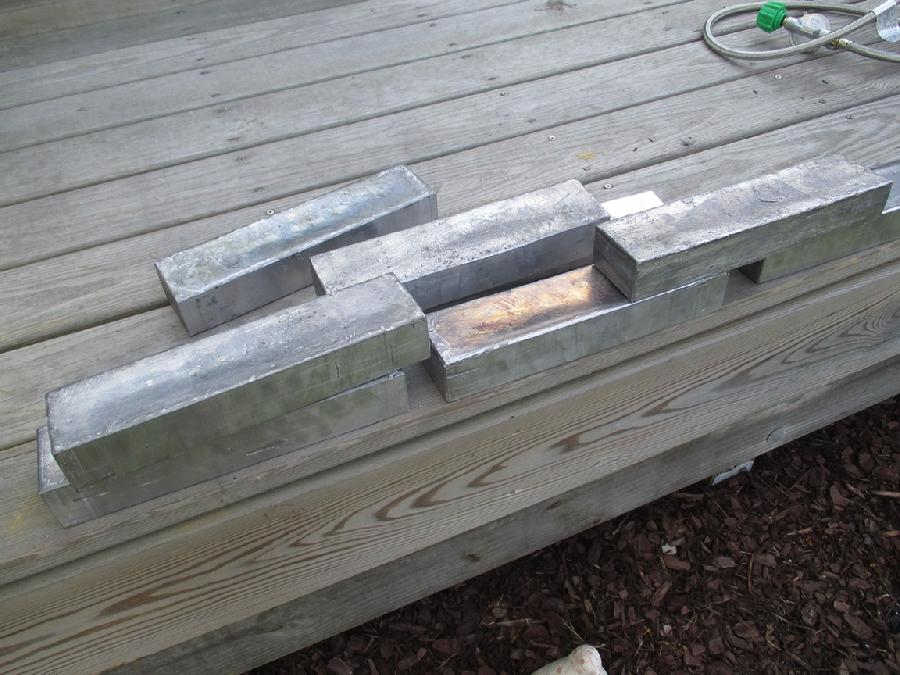
Pictured is about 225 lbs of lead ingots we cast to use as needed to trim out the Far Reach.
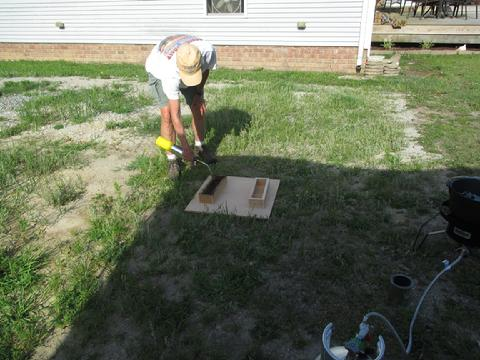
When I called the recycling center they told me they had 60lb ingots of lead. I thought, "Terrific, I'll go pick up four bars and be done with it." But, what I found when I arrived at the recycling center were lead ingots covered in grime, dirt, grease, somewhat mangled, and poorly cast. I did not want to use that lead. But, they also had a large box of lead sheeting that had come out of the walls of a hospital. There were small pieces and large 2' x 3' sections. Most was folded and bent into all kinds of shapes. Standing there and thinking about my options (I really did not want another project) I mused that it couldn't be that hard to melt it down. The frontiersman melted lead over camp fires to make their own bullets. Plus, I had read about people casting lead for their ballast keels. "How hard can it be?" After reading about it on the internet and watching a few videos I learned that, with a few safety precautions, it is not too difficult. In fact it turned out to be fairly simple and very informative and rewarding. So, a couple of days after I picked up the lead I spent an hour and a half one evening cutting the large folded and twisted sheets of lead into small squares. Then, I used some scrap 3/4" plywood to make molds 2" deep x 3 wide by 12.5" long for a total of 75 cubic inches. It turned out this would equal a lead bar almost exactly 30 lbs, which was what I was shooting for as I thought a 60 lb bar would be too heavy to handle comfortably. I wanted to tighten the corner joints of the molds so I cut half laps with the dado blade on the table saw. Then, I screwed the moulds together with drywall screws.

I hammered the lead sheets flat then cut them into small sections with the garden sheers and tin snips.
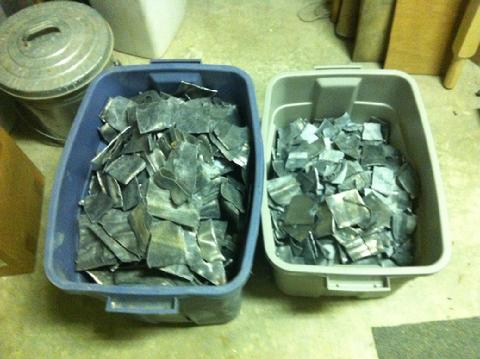
This is what 236 lbs of lead looks like.
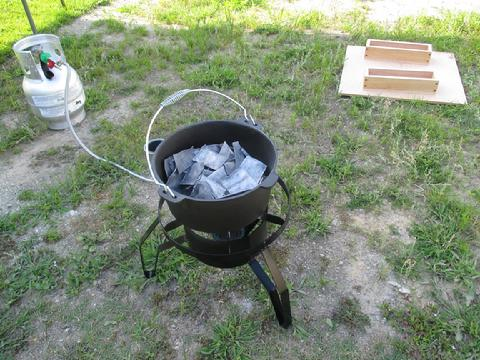
We started setting up for the casting operation at 0800 this morning. The forecast was for 100 F degrees by 1300. What a hell of a day to be casting lead! I asked my sister Tricia if she could give a hand. She is a great helper and as a retired San Diego Fire Captain she knows how keep things safe. We had a fire extinguisher; a bucket of water to put pour onto a lead splatter if it got on us; a fire smothering blanket; a steel garbage can to invert and put over the burner if it caught fire, etc. I wore coveralls, welding gloves, and a face shield when pouring or stirring the lead. I really did not know what to expect as I had never cast anything before except a fishing lure. Surprisingly, it took just 2:45 minutes from lighting off the burner to when we poured the last ingot. There was nothing too it. Click on the pictures below for additional info. What is not shown is I clamped a pair of vise grips to the back of the Dutch oven. Thus, I was able to hold the wire handle with one hand and tilt the pot forward into the mold by lifting the back end of the pot and guiding it with the vise grips. I picked up that technique when I stumbled across a blog by Lezlie Henson, a builder of micro cruisers. Click here for her entry on making lead ingots. In her blog post there is a link for a you tube video that we found very helpful. There is no narrative in the video but, nonetheless, for a 1:29 second video it contained a lot of info. A picture, as they say, is worth a thousand words. This afternoon, I cleaned up the ingots with a chisel, a power planer, and an old 1/8" round over bit in my trim router.
Below:
1. We set up in the backyard in the shade of a portable canopy. We used the space the boat shed had been located for the actual casting of the lead.
2. We preweighed the lead on a bathroom scale then added it to the pot and lit off the burner. It took 15 minutes to melt the lead.
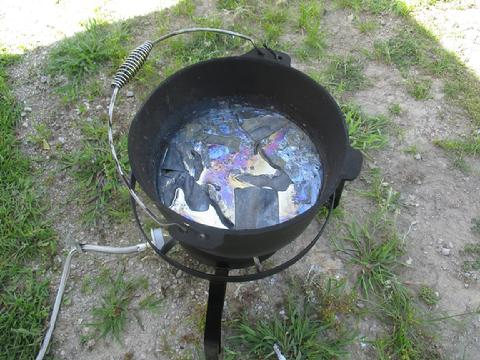
3. This is just before the lead was fully melted. As soon as it was a liquid I turned the burner down and scooped out the dross with a slotted spoon.
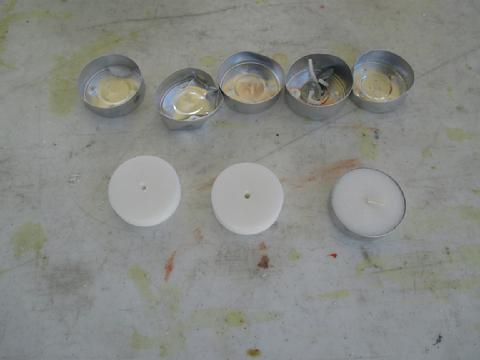
4. With the lead in a liquid state and the obvious dross removed I tossed in a tea candle to act as floss. It smoked then turned to flame as the parrafin in the candle caught fire. It bured for about 45 seconds then went out. The impurities in the mettle were brought to the surface and I scooped that out. We were ready to pour.
5.Tricia used a propane torch to char the inside of the wood molds. This made it less likey they would catch fire when the 650 degree lead was poured. Also, it ensure there was no moisture in the wood to turn to steam and explode hot lead onto us.
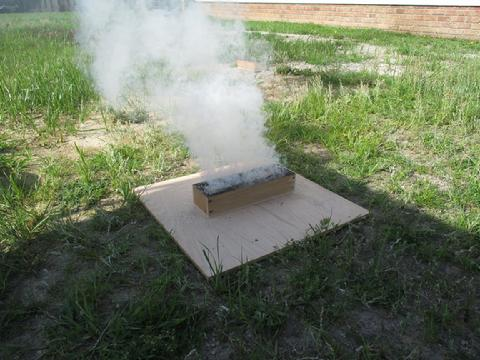
6. I poured the lead into the mold. Instant steam and the lead boild for a least 30 seconds. It started to harden in a few minutes but remained very hot for at least 30 minutes to an hour.
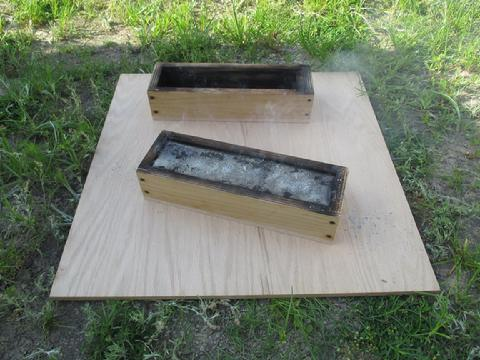
7. One ingot poured and the other mold ready to receive molten lead.
8. After about an hour I turned the first molds over and shook them to free the lead. I needed to reuse two molds for the eight ingots.
9. The last two ingot. I only had enough lead to fill the eight mold about half way, thus 225 pounds of lead.